Xunwei IMX6ULL development board Linux 4G communication experiment
In the previous chapters, we learned how to use wired network or wifi, but there are many environmental restrictions when using wireless network or wifi. In this case, you can use the 4G module to access the Internet. In this chapter, learn how to use the 4G module to achieve Internet access.
56.1 4G network connection
For embedded Linux , 4G network connection is a relatively easy function to implement. Most of the 4G module interfaces are MiniPCIE interfaces, but if you take a deeper look, you will find that the communication interfaces of 4G modules are all USB . Therefore, the driver of the 4G module is the USB driver. As long as the USB driver is normal, the 4G module can communicate normally on the hardware. Let's take a look at the hardware schematic diagram of the 4G module: 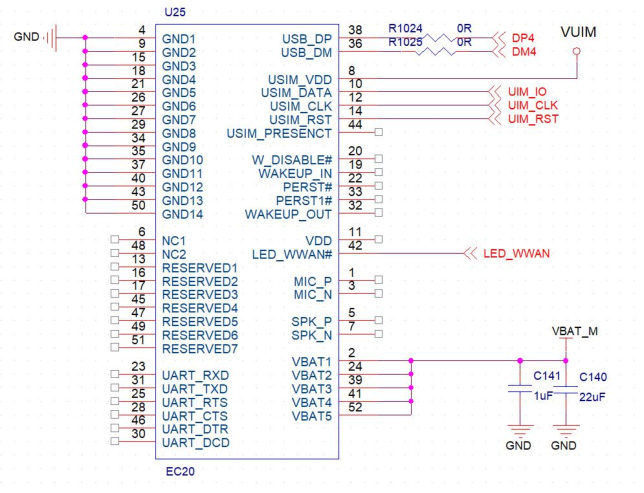
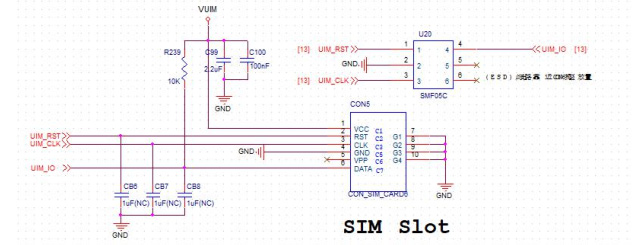
In the schematic diagram, U25 is the MiniPCIE interface of the 4G module, and then the communication pins will be connected to the HUB chip of U15, so the 4G module will be recognized as a USB device, and CON5 is the SIM card interface, when using the 4G module, you need to insert the SIM card first. The EC20 4G module used on the i.MX6UL Terminator Development Board is shown in Figure 56.1.3: 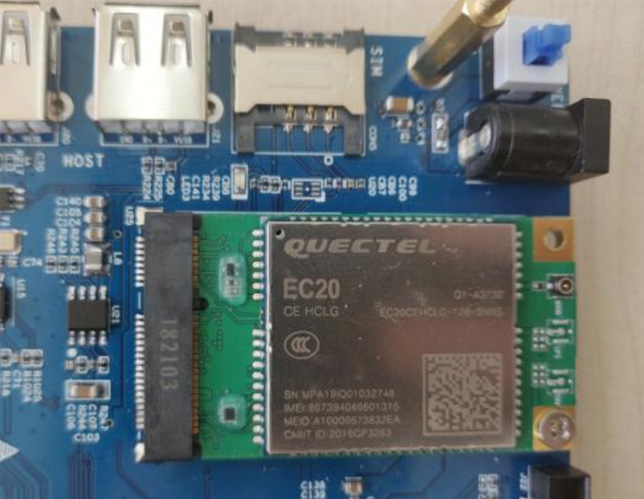
56.2 EC20 4G Module Configuration
56.2.1 Adding USB Device Information
To use the EC20 4G module, you first need to add the EC20 USB in the Linux kernel information, so that the
EC20 4G module can be correctly identified after the kernel is started . Open the drivers/usb/serial/option.c file under the Linux kernel and add the following information:
1809 /* add support EC220 4G Module */
1810 { USB_DEVICE(0x05C6, 0x9090) }, /* Quectel UC15 */
1811 { USB_DEVICE(0x05C6, 0x9003) }, /* Quectel UC20 */
1812 { USB_DEVICE(0x05C6, 0x9215) }, /* Quectel EC20 */
1813 { USB_DEVICE(0x2C7C, 0x0125) }, /* Quectel EC25/EC20 R2.0 */
1814 { USB_DEVICE(0x2C7C, 0x0121) }, /* Quectel EC21 */
1815 /* end add */
where line 1813 is the EC20 4G module USB information.
56.2.2 Linux Kernel Configuration
After adding the USB information of the EC20 4G module, the Linux kernel configuration needs to be modified to support the USBNET function. The specific configuration is as follows:
Device Drivers --->
- Network device support --->
<*> USB Network Adapters --->
<*> Multi-purpose USB Networking Framework
configuration is shown in Figure 56.2.2.1: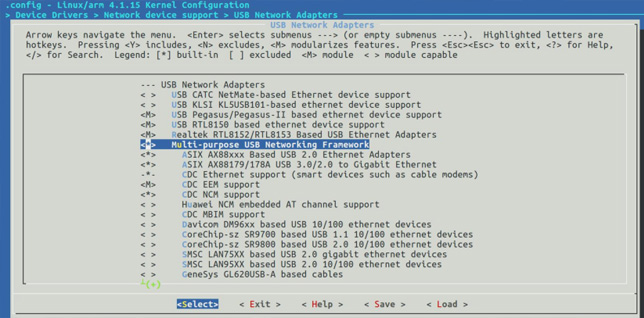
Next, we also need to enable the USB serial port GSM and CDMA drivers, configure The path is as follows:
Device Drivers ---> - USB support --->
<*> USB Serial Converter support --->
<*> USB driver for GSM and CDMA modems
configuration as shown in Figure 56.2.2.2: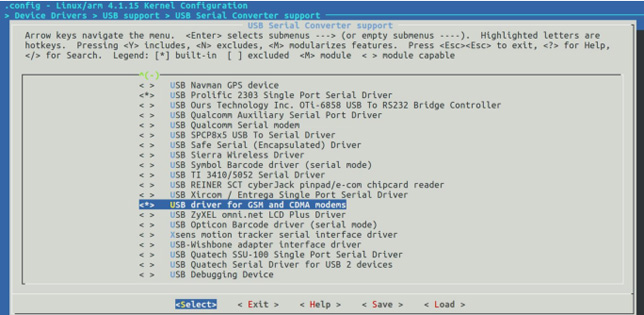
Then configure ppp, the configuration path is as follows:
Device Drivers ---> - Network device support --->
<*> PPP (point-to-point protocol) support
<*> PPP BSD-Compress compression
<*> PPP Deflate compression - PPP filtering
<*> PPP MPPE compression (encryption) - PPP multilink support
<*> PPP over Ethernet
<*> PPP support for async serial ports
<*> PPP support for sync tty ports
configuration is shown in Figure 56.2.2.3: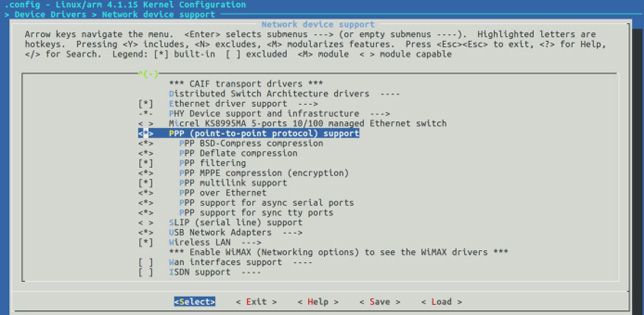
After the configuration is complete, recompile the kernel, and then start with the new kernel development board. If the configuration is successful, after the development board is started, the information as shown in Figure 56.2.2.4 will be printed:
it can be seen that the EC20 4G module is successfully recognized, and 5 USB devices are virtualized, namely ttyUSB0~ttyUSB4.
56.3 EC20 4G module networking test
56.3.1 Compiling PPP software package
First copy ppp-2.4.4.tar.gz to Ubuntu , and then execute the following command to decompress:
tar -xvf ppp-2.4.4.tar.gz
decompression is completed ppp-2.4.4 directory, enter the ppp-2.4.4 directory as shown in Figure 56.3.1.1:
use configure to configure, the command is as follows:
./configure
The result is shown in Figure 56.3.1.2: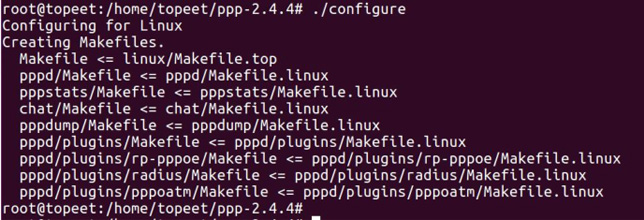
After the configuration is complete, use the following command Compile:
make CC=arm-linux-gnueabihf-gcc
"CC=arm-linux-gnueabihf-gcc" specifies the compiler, which uses the same compiler as the Linux kernel of the development board.
The compilation is completed as shown in Figure 56.3.1.3:
After the compilation is completed, chat, pppd, pppdump, pppstats executable files are generated in the four directories of chat, pppd, pppdump, and pppstats, which are used for the subsequent 4G module networking test.
56.3.2 EC20 4G module networking test
First install the EC20 4G module, antenna and SIM card, as shown in Figure 56.3.2.1: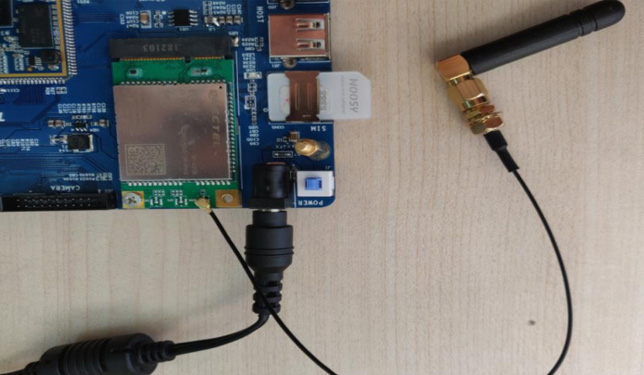
After the development board is ready, start the Linux system, after the system starts, enter the /etc directory, and then create ppp The specific command is as follows:
cd /etc //Enter the etc directory
mkdir ppp //Create the ppp directory
After the directory is created, use the U disk to copy the four executable files of chat, pppd, pppdump and pppstats compiled in the previous section to / In the etc/ppp directory, as shown in Figure 56.3.2.2:
Then create a pap-secrets file in the /etc/ppp directory, and use the following command:
touch pap-secrets //Create pap-secrets file
vi pap-secrets //Open pap-secrets file
Enter the following content:
# Secrets for authentication using PAP
# client server secret IP addresses
card * card *
There is a password comparison when the 4G signal communicates, and the communication can be performed if the password is correct. The above shows that the user is card and the password is card.
Then create a new folder peers, command "mkdir peers".
Go to the peers folder and create a wcdma file. The command is as follows:
touch wcdma
vi wcdma
Enter the following:
# /etc/ppp/peers/wcdma
# This is pppd script for China liantong
# Usage: root>pppd call wcdma
hide-password
noauth
connect '/etc/ppp/chat -s -v -f /etc/ppp/peers/wcdma-chat-connect'
disconnect '/etc/ppp/chat -s -v -f /etc/ppp/peers/wcdma-chat -disconnect'
debug
/dev/ttyUSB2
115200
defaultroute
noipdefault
novj
novjccomp
noccp
ipcp-accept-local
ipcp-accept-remote
local
lock
dump
nodetach
user "card"
password "card"
crtscts
remotename 3gppp
ipparam 3gppp
usepeerdns
Note that the /dev/ttyUSB2 device node file is used.
"user "card"" and "password "card"" correspond to the username and password in the pap-secrets file.
Create a wcdma-chat-connect file:
touch wcdma-chat-connect
vi wcdma-chat-connect
The content is as follows:
ABORT "BUSY"
ABORT "NO CARRIER"
ABORT "NO DIALTONE"
ABORT "ERROR"
ABORT "NO ANSWER"
TIMEOUT 120
"" AT
OK \rATZ
OK \rAT+CGDCONT=1,"IP","3gnet",,0,0
OK-AT-OK ATDT*99#
CONNECT \d\c
OK here \rAT+CGDCONT=1,"IP ","3gnet",,0,
Create the wcdma-chat-disconnect file:
touch wcdma-chat-disconnect
vi wcdma-chat-disconnect
The content is as follows:
ABORT "ERROR"
ABORT "NO DIALTONE"
SAY "INSending break to the modem\n"
""\k"
""+ ++ATH"
SAY "\nGood bye\n"
After the required files are created, the network test can be performed.
Turn off the eth0 device first, because it conflicts with the EC20 4G module, and only one device can be used at the same time. The command is as follows:
ifconfig eth0 down
Then enter the command in the /etc/ppp directory:
./pppd call wcdma &
The result is shown in Figure 56.3.2.3: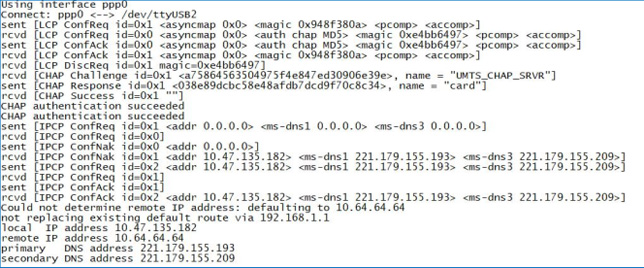
The above figure shows that the IP address after successful networking is 10.47.135.182, use the ifconfig command to view The result is shown in Figure 56.3.2.4: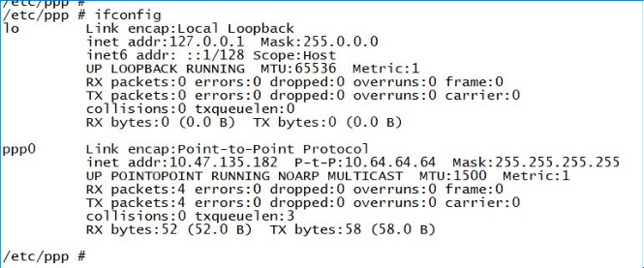
Use the ping command to check that the external network can be pinged. The command is as follows:
ping 202.108.22.5 -c 4
The "-c" option specifies the number of times to ping the network. "202.108.22.5" is Baidu's IP address, the result is shown in Figure 56.3.2.5:
I found that I can't ping the external network. I am willing because the DNS is not set correctly. There is a file resolv.conf under etc. This file is used to put DNS. It's that the domain name in this is not set correctly. However, this file is forced to be copied to 192.168.1.1 in the eth0 run script. This results in that even if the correct DNS is set in this file, after rebooting, it will find that the file is already 192.168.1.1. This is because eth0 is self-starting at boot.
We create a new file resolv.conf_back in the /etc directory:
touch resolv.conf_back
vi resolv.conf_back
enter the following content:
nameserver 202.99.160.68
nameserver 221.130.33.52
nameserver 221.130.33.60
nameserver 192.168.1.1
Then create a new script file ppp0:
touch ppp0
vi ppp0
enter the following:
#!/bin/sh
ifconfig eth0 down
cp /etc/resolv.conf_back /etc/resolv.conf
/etc/ppp/pppd call wcdma&
Modify the execution permission of the ppp0 file:
chmod 777 ppp0
The first step here is to turn off eth0, the second step is to overwrite our DNS file to resolv.conf, and the third step is to run. Then reboot and execute the ppp0 script. The command is as follows: After the
/etc/ppp0
script is successfully executed, use the ping command again. The result is shown in Figure 56.3.2.6: The
picture shows that the IP address of Baidu can be pinged normally. So far, the EC20 4G module can be used normally.